Unlock the Secrets to Bakery-Style Chocolate Chunk Cookies: Browned Butter & The Essential Chill
Imagine biting into a chocolate chunk cookie that rivals your favorite artisan bakery: a perfect balance of crispy, golden edges, a sumptuously soft and chewy center, and an abundance of rich, molten chocolate in every mouthful. This isn't just a dream – it's an achievable reality in your own kitchen. The secret to transforming good cookies into truly *exceptional* chocolate chunk cookies lies in two fundamental techniques: browning your butter and patiently chilling your dough. These steps elevate simple ingredients into a symphony of depth, texture, and unparalleled flavor.
For months, we've dedicated ourselves to perfecting a recipe that embodies everything we desire in a chocolate chunk cookie. We sought that elusive combination of thin, crisp edges, a deliciously fudgy and chewy core, and a flavor profile that's rich, buttery, and boasts a profound caramelized sweetness beautifully offset by a hint of salt. Our rigorous testing, though demanding, culminated in a recipe that consistently delivers perfection, batch after batch. And the best part? While the results are complex, the process itself is surprisingly straightforward, often requiring just one bowl for mixing.
The Magic of Browned Butter: A Flavor Game-Changer
If there's one step that will fundamentally change your perception of a homemade chocolate chunk cookie, it's browning the butter. This isn't merely melting; it's a transformative process that unleashes a remarkable depth of flavor, infusing your cookies with nutty, toasted, and intensely caramel-like notes that are impossible to achieve with plain melted butter.
When butter is gently heated past its melting point, the milk solids separate and toast, undergoing the Maillard reaction – the same chemical process responsible for the delectable crust on seared steaks or the browning of roasted vegetables. As these solids turn a golden amber, they release an intoxicating aroma and a complex flavor profile that provides the foundational richness for truly bakery-style chocolate chunk cookies. This browned butter acts as a flavor enhancer, adding sophistication and a layer of warmth that permeates every bite, creating a depth that even the best chocolate can't achieve alone.
**How to Brown Butter Perfectly:**
1. **Melt Slowly:** Start by melting your butter in a light-colored saucepan over medium-low heat. The light color helps you monitor the color changes.
2. **Swirl and Watch:** As it melts, it will foam. Continue cooking, gently swirling the pan occasionally. The foam will eventually subside, revealing the amber milk solids at the bottom.
3. **Smell and Color:** Keep a close eye on the color, which will progress from pale yellow to golden, then to a rich, nutty brown. You'll smell a fragrant, nutty aroma.
4. **Stop Immediately:** Once the solids are golden brown and fragrant, remove the pan from the heat *immediately* to prevent burning. Pour the browned butter, including the toasted bits, into a heatproof bowl to cool slightly before mixing with your sugars. Those tiny brown bits are packed with flavor!
The Chill Factor: Why Patience Makes Perfect Cookies
We get it – waiting is hard, especially when the promise of warm, gooey chocolate chunk cookies is on the horizon. However, the chilling period for your cookie dough is non-negotiable for achieving that coveted bakery-style texture and rich flavor. Think of it as a crucial ingredient, not just a waiting game.
Chilling the dough for at least 24 hours, and ideally up to 36 hours, works wonders on multiple levels:
* **Hydration & Flavor Development:** Over time, the flour fully hydrates, leading to a softer, chewier crumb. More importantly, the flavors within the dough – especially from the browned butter and sugars – have a chance to meld and deepen. This creates a more complex and nuanced taste that is simply impossible to replicate with unchilled dough. You'll notice even the bites without chocolate are incredibly flavorful.
* **Fat Solidification:** As the butter chills, it re-solidifies. This is critical for preventing the cookies from spreading too rapidly in the oven, ensuring they maintain a thicker, chewier texture with those desirable soft centers and slightly crisp edges. Without sufficient chilling, your cookies are more likely to spread thin and lose their characteristic chew.
* **Caramelization:** The extended chill encourages better caramelization of the sugars during baking, contributing to those gorgeous golden-brown edges and an even richer flavor profile.
This step is essential to developing the chewiness and depth of flavor that defines truly great chocolate chunk cookies. Trust the process; the wait is absolutely worth it for the superior taste and texture you'll achieve.
Crafting the Perfect Dough: Beyond Basic Ingredients
While browned butter and chilling are key techniques, the quality and combination of your ingredients are equally vital for extraordinary chocolate chunk cookies. Every component plays a specific role in achieving that perfect balance of sweetness, saltiness, and texture.
Key Ingredients & Their Impact:
- Butter: We always bake with high-quality salted butter, such as Kerrygold, for its richer flavor and higher fat content. If using unsalted butter, be sure to increase the salt content in your recipe slightly to compensate and achieve that crucial flavor balance.
- Sugars: The blend of white granulated sugar and soft brown sugar is non-negotiable. Granulated sugar contributes to crisp edges and spread, while brown sugar provides moisture, chewiness, and delightful caramel notes. For an extra depth of flavor and unique texture, we highly recommend Demerara sugar as your brown sugar component. While dark brown sugars like Muscovado are delicious, they can sometimes make the cookies too dark for some preferences.
- Vanilla: Use the best quality vanilla you can find. Vanilla paste offers beautiful little flecks and a more intense flavor, but a good quality vanilla extract works wonderfully as a substitute.
- Eggs: Act as a binder and add richness to the dough. Ensure they are at room temperature for better emulsion with the butter and sugars.
- Flour: All-purpose flour is standard, but some bakers prefer cake flour for an even softer crumb. If you're looking for a gluten-free option, use a reliable gluten-free blend you're comfortable baking with.
- Baking Powder & Baking Soda: These leaveners work in tandem. Baking powder gives the cookies a little lift, while baking soda aids in browning and contributes to that desirable chewy texture and slight spread. Don't be afraid of the baking soda; its impact on texture is profound.
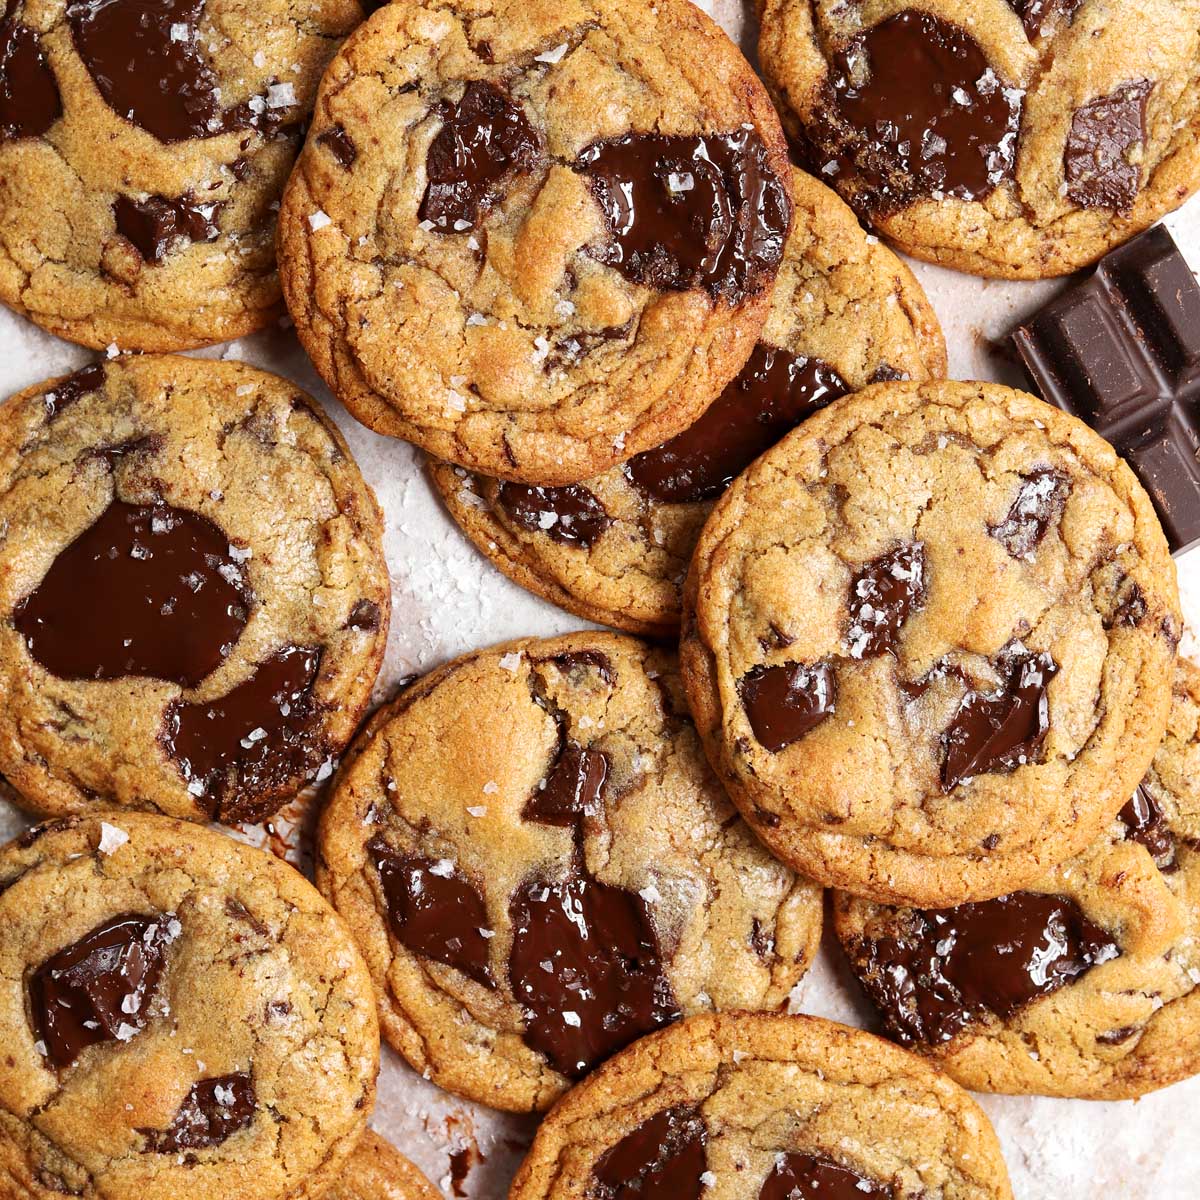
- Salt: This is arguably one of the most underrated ingredients in a cookie. The amount of salt might seem generous, but it's essential for balancing the sweetness and truly highlighting the complex chocolate flavor. A good pinch of flaky sea salt sprinkled on top after baking further elevates the experience.
- Chocolate: The star of the show! Quality makes a *massive* difference. Use a combination of dark (70% cocoa is excellent) and milk chocolate, roughly chopped into irregular chunks. This ensures every bite is packed with varying textures and intensities of chocolate. Brands like Lindt, Tony's Chocolonely, Ghirardelli, or Valrhona are fantastic choices. While chocolate chips work, chopped chunks melt more beautifully and create those coveted pools of molten chocolate. For a less-sweet cookie, lean into a higher percentage of dark/bittersweet chocolate. For more insights into achieving those irresistible crispy edges combined with a perfectly chewy interior, check out our guide on The Ultimate Chewy Chocolate Chunk Cookies: Crispy Edges & Perfect Flavor.
Assembling Your Dough with Ease:
The beauty of this recipe is its simplicity. After browning and slightly cooling your butter, combine it with the sugars in a large bowl. Stir until well combined, then whisk in the vanilla and eggs. Finally, gradually add your dry ingredients, mixing until just combined, being careful not to overmix. Gently fold in your generous quantity of chopped chocolate chunks. Using an ice cream or cookie scoop (a 2.3in/6cm scoop is ideal) will help create uniform cookies. Scoop the dough onto a parchment-lined baking sheet, cover tightly with plastic wrap, and let the magic of the chill begin! If you're looking for a simpler, faster route without compromising on richness, our article on
One-Bowl Chocolate Chunk Cookies: Thin, Chewy & Exceptionally Rich offers fantastic tips for an equally exceptional cookie.
Baking for Perfection: Tips for Golden, Chewy Results
After the patient wait, it's time to bring your chocolate chunk cookies to life!
1. **Preheat Accurately:** Ensure your oven is fully preheated to the correct temperature. An accurate oven temperature is crucial for even baking and proper spread.
2. **Space Them Out:** Place your chilled dough scoops onto a parchment-lined baking sheet, leaving ample space between them to allow for spreading.
3. **Watch, Don't Overbake:** Bake until the edges are golden brown and set, but the centers still look slightly soft and gooey. Remember, cookies continue to cook slightly from residual heat once removed from the oven. For that ultimate chewy center, err on the side of slightly underbaking.
4. **Cooling Protocol:** Allow the cookies to cool on the baking sheet for 5-10 minutes. This helps them set and prevents them from breaking when you transfer them. Then, carefully move them to a wire rack to cool completely (if you can resist!).
Pro Tips & Customizations for Your Signature Cookie
* **Don't Skimp on Quality:** As mentioned, quality butter and chocolate are non-negotiables for bakery-level results.
* **Flaky Sea Salt Finish:** A light sprinkle of flaky sea salt immediately after the cookies come out of the oven is a game-changer. It provides a delightful textural crunch and brightens all the flavors.
* **Embrace Variations:**
* **Nuts:** Toasted pecans or walnuts add a wonderful crunch and earthy flavor.
* **Spices:** A pinch of cinnamon, a touch of cardamom, or a teaspoon of espresso powder can deepen the chocolate flavor.
* **Different Chocolates:** Experiment with white chocolate chunks for a contrasting sweetness, or even a mix of dark, milk, and white for a triple chocolate delight.
Mastering these two fundamental techniques – browning your butter and chilling your dough – will fundamentally transform your homemade chocolate chunk cookies. You'll move beyond simply good cookies to a realm of deep, caramelized flavors, irresistible chewiness, and that coveted bakery-style perfection. The journey from humble ingredients to an extraordinary indulgence is truly rewarding, and with these secrets in your baking arsenal, you're ready to create memorable treats that will impress every palate. So, grab your butter, chop your chocolate, and prepare for cookie greatness!